Tone mapping
Lighting is arithmetic on light. Add a bright lamp to a shiny surface and the sum can be 5, or 50. A display can show values from 0 to 1 and nothing more. What happens in between is a design decision, and this page is about making it on purpose.
Linear in, sRGB out
Light adds up in linear units: twice the photons is twice the number. Displays are not linear: a pixel value of 0.5 is not half as bright as 1.0, because the sRGB encoding spends its precision where eyes are sensitive. The rule from linear and sRGB colour is to do all maths in linear space and convert exactly once, at the very end.
That has a consequence for an 8-bit framebuffer. If the shader converts to sRGB before storing, the stored picture is no longer linear and cannot be processed properly afterwards (blurring sRGB values darkens edges). If it does not convert, an 8-bit texture stores 256 linear steps, far too coarse in the shadows, and it clips everything above 1.
HDR and tone mapping
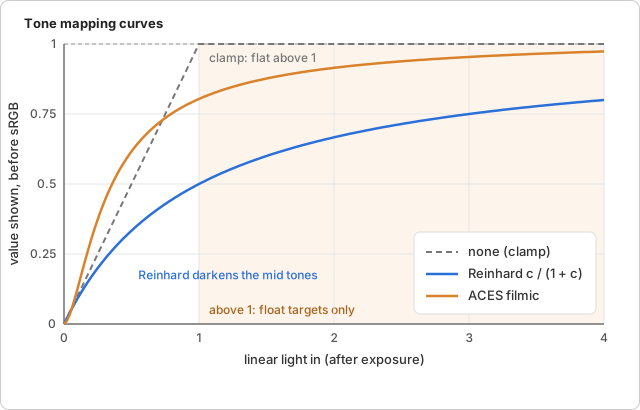
The fix is a render target whose format has more room: half float, 16 bits per channel that can hold any value from tiny to 65504. Nothing is lost by a lamp that adds up to 5; it is stored as 5. This is high dynamic range (HDR). The extra range is only useful if something maps it down for the display at the end, and that is tone mapping: a curve that takes any non-negative linear value and returns one in 0..1.
Two curves are implemented:
-
Reinhard,
c / (1 + c). Simple to reason about: 0 stays 0, 1 becomes 0.5, and large values approach 1 without ever reaching it. The price is a flat picture, everything is pulled towards grey. -
ACES filmic, a fit by Krzysztof Narkowicz of the curve the film industry uses:
(c · (2.51c + 0.03)) / (c · (2.43c + 0.59) + 0.14)It has an S shape: a toe that deepens the shadows, a straight middle that keeps contrast, and a shoulder that rolls the highlights off gently. Colours in the bright parts keep their hue instead of clipping to white.
Exposure comes before the curve: the colour is multiplied by a number, like the aperture and shutter of a camera. Doubling it is one stop. It is a plain uniform, so a slider changes the picture without touching the scene.
A pass that draws a picture
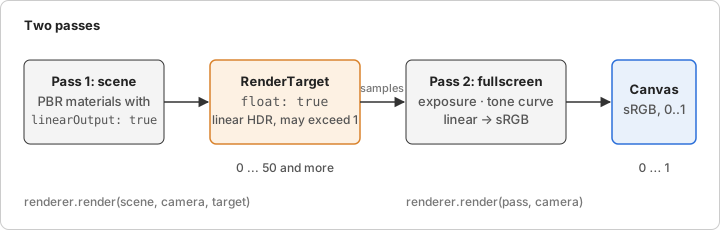
Applying the curve to every pixel of a finished image is a fullscreen
pass: draw a shape that covers the whole screen and let the fragment shader
sample the previous result at its own position. The shape is one triangle,
larger than the screen, with the corners (-1, -1), (3, -1) and (-1, 3) in
clip space. The GPU clips it to the screen, which needs no shared vertices, so
there is no diagonal seam where the two triangles of a quad would meet. The
vertex shader turns the position into texture coordinates,
vUv = position · 0.5 + 0.5, and ignores every matrix.
In magic-pixels
const target = new RenderTarget(canvas.width, canvas.height, { float: true });
const material = createPbrMaterial({ linearOutput: true /* ... */ });
const pass = new Scene();
pass.add(
createFullscreenMesh(
createToneMapMaterial({ map: target.colorAttachment, exposure: 1 })
)
);
renderer.render(scene, camera, target); // linear HDR into the target
renderer.render(pass, camera); // tone map to the canvas
createPbrMaterial({ linearOutput: true })skips the sRGB conversion at the end of the PBR shader (the default keeps it, so a scene drawn straight to the canvas is unchanged). The scene must not be converted twice.- createToneMapMaterial reads
map, multiplies by theexposureuniform, applies the curve (a ToneMapping,'aces'by default) and converts to sRGB. The curve is baked into the shader source with a#define, like the maps of the PBR material. - createFullscreenMesh builds the triangle. Any other pass, a blur or
a colour grade, is a createFullscreenMaterial with your own fragment
shader reading
vUv; the material turns depth testing and depth writes off, because a pass just overwrites every pixel. The camera you pass torenderdoes not matter.
Where it lives:
src/shaders/fullscreen.vert,src/shaders/tonemap.frag: the pass.src/scene/fullscreen.ts: createFullscreenMesh.src/scene/material.ts: createFullscreenMaterial, createToneMapMaterial and thelinearOutputoption.src/shaders/pbr.frag: the sRGB conversion behind theLINEAR_OUTPUTdefine.
Try it
Render targets
lights a scene brighter than the display can show. Switch the curve to
none and the highlights clip to white; drag the exposure slider with ACES
on and watch the highlights roll off. Then add a second fullscreen pass of
your own between the scene and the tone mapping: a createFullscreenMaterial
that darkens the corners, drawn into a second target (ping-pong).
Further reading
- Learn OpenGL: HDR: float framebuffers, Reinhard, and exposure.
- Learn OpenGL: Gamma correction: why the last step converts to sRGB.
- Krzysztof Narkowicz: ACES filmic tone mapping curve: where the fit above comes from.
- Wikipedia: Tone mapping: the general problem and the families of curves.